Getting Auth with Cookie vs Token | AngularJS

These last few days, i’ve been working with AngularJS, dealing with RESTFull-API concept in my back end. And now, i learn to get auth with AngularJS.
The scenario is, when user login, i’ll send username and password, server with validate user credentials and send the auth that must be saved and for the next request, i had send the auth. Ok, and it drives me into Cookies vs Token. Which one i’ll use?

My senior do some research and decided to try with cookie first. But, i still want to share about this matter.

Good articles is here : http://www.angulartutorial.net/2014/05/set-headers-for-all-http-calls-in.html and http://www.webdeveasy.com/interceptors-in-angularjs-and-useful-examples/

Ya, there some word about interceptors :

Interceptors allow you to:

  • Intercept a request by implementing the request function: This method is called before $http sends the request to the backend, so you can modify the configurations and make other actions. This function receives the request configuration object as a parameter and has to return a configuration object or a promise. Returning an invalid configuration object or promise that will be rejected, will make the $http call to fail.
  • Intercept a response by implementing the response function: This method is called right after $http receives the response from the backend, so you can modify the response and make other actions. This function receives a response object as a parameter and has to return a response object or a promise. The response object includes the request configuration, headers, status and data that returned from the backend. Returning an invalid response object or promise that will be rejected, will make the $http call to fail.
  • Intercept request error by implementing the requestError function: Sometimes a request can’t be sent or it is rejected by an interceptor. Request error interceptor captures requests that have been canceled by a previous request interceptor. It can be used in order to recover the request and sometimes undo things that have been set up before a request, like removing overlays and loading indicators, enabling buttons and fields and so on.
  • Intercept response error by implementing the responseError function: Sometimes our backend call fails. Other times it might be rejected by a request interceptor or by a previous response interceptor. In those cases, response error interceptor can help us to recover the backend call.

I found a good article here and here.

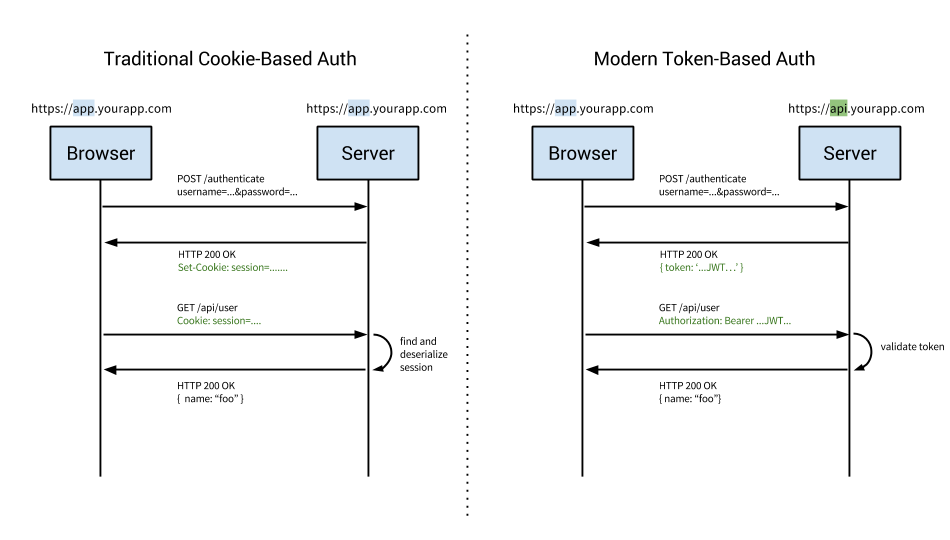
What are the benefits of using a token-based approach?

  • Cross-domain / CORS: cookies + CORS don’t play well across different domains. A token-based approach allows you to make AJAX calls to any server, on any domain because you use an HTTP header to transmit the user information.
  • Stateless (a.k.a. Server side scalability): there is no need to keep a session store, the token is a self-contanined entity that conveys all the user information. The rest of the state lives in cookies or local storage on the client side.
  • CDN: you can serve all the assets of your app from a CDN (e.g. javascript, HTML, images, etc.), and your server side is just the API.
  • Decoupling: you are not tied to a particular authentication scheme. The token might be generated anywhere, hence your API can be called from anywhere with a single way of authenticating those calls.
  • Mobile ready: when you start working on a native platform (iOS, Android, Windows 8, etc.) cookies are not ideal when consuming a secure API (you have to deal with cookie containers). Adopting a token-based approach simplifies this a lot.
  • CSRF: since you are not relying on cookies, you don’t need to protect against cross site requests (e.g. it would not be possible to <iframe> your site, generate a POST request and re-use the existing authentication cookie because there will be none).
  • Performance: we are not presenting any hard perf benchmarks here, but a network roundtrip (e.g. finding a session on database) is likely to take more time than calculating an HMACSHA256 to validate a token and parsing its contents.
  • Login page is not an special case: If you are using Protractor to write your functional tests, you don’t need to handle any special case for login.
  • Standard-based: your API could accepts a standard JSON Web Token (JWT). This is a standard and there are multiple backend libraries (.NET, Ruby, Java, Python, PHP) and companies backing their infrastructure (e.g. Firebase, Google, Microsoft). As an example, Firebase allows their customers to use any authentication mechanism, as long as you generate a JWT with certain pre-defined properties, and signed with the shared secret to call their API.

Ya, as you see, JSON Web Token is quite popular i think, and you can see some example here : https://auth0.com/learn/token-based-authentication-made-easy/

Encoding vs Hashing vs Encrypting vs Obfuscation

Hi all, i wanna share my little experience. I’m still working with ionic.

Now, i learn about data security in mobile application. I learn from the very basic, and it drives me into data encryption. I build a little application to explore. The condition is : this application will work offline and online. When it works offline, the data will saved on the phone storage (local). This can be done by using sqlite (for example). And, the data is so important so we want to protect.

As the authentication i just use basic auth, nice artikel is here https://luckymarmot.com/paw/doc/auth/basic-auth and i still learning to use JWT (JSON Web Token) for authentication, login credentials etc. Next time, i’ll share. Now, i wanna talk about encode, hash and encrypt. I’ve read some article and i’ll share it with you.

Encoding

The purpose of encoding is to transform data so that it can be properly (and safely) consumed by a different type of system, e.g. binary data being sent over email, or viewing special characters on a web page. The goal is not to keep information secret, but rather to ensure that it’s able to be properly consumed.

Encoding transforms data into another format using a scheme that is publicly available so that it can easily be reversed. It does not require a key as the only thing required to decode it is the algorithm that was used to encode it.

Examples: ASCII, Unicode, URL Encoding, Base64

(source)

Hashing

Hashing is a type of algorithm which takes any size of data and turns it into a fixed-length of data.  Hashing is a one way function. It’s irreversible, you apply the secure hash algorithm and you cannot get the original string back.

Some hashing algorithms:

  • MD-5
  • SHA-1
  • SHA-2
  • SHA-3

When to use hash? 

We can use it to store password, as hashes are inherently one-way in their nature. By storing passwords in hash format, it’s very difficult for someone with access to the raw data to reverse it (assuming a strong hashing algorithm and appropriate salt has been used to generate it). 

When storing a password, hash it with a salt, and then with any future login attempts, hash the password the user enters and compare it with the stored hash. If the two match up, then it’s virtually certain that the user entering the password entered the right one.

Encrypting

Encryption turns data into a series of unreadable characters, that aren’t of a fixed length. The key difference between encryption and hashing is that encrypted strings can be reversed back into their original decrypted form if you have the right key. 

There are two primary types of encryption, symmetric key encryption and public key encryption. In symmetric key encryption, the key to both encrypt and decrypt is exactly the same. This is what most people think of when they think of encryption. 

Public key encryption by comparison has two different keys, one used to encrypt the string (the public key) and one used to decrypt it (the private key). The public key is is made available for anyone to use to encrypt messages, however only the intended recipient has access to the private key, and therefore the ability to decrypt messages.

Popular algorithm : 

  • AES – AES is the “gold standard” when it comes to symmetric key encryption, and is recommended for most use cases, with a key size of 256 bits.
  • PGP – PGP is the most popular public key encryption algorithm
  • RSA
  • DES

When should be used?

The purpose of encryption is to transform data in order to keep it secret from others, e.g. sending someone a secret letter that only they should be able to read, or securely sending a password over the Internet. Rather than focusing on usability, the goal is to ensure the data cannot be consumed by anyone other than the intended recipient(s).

If you have a usecase where you have determined that encryption is necessary, you then need to choose between symmetric and public key encryption. Symmetric encryption provides improved performance, and is simpler to use, however the key needs to be known by both the person/software/system encrypting and decrypting data.

If you were communicating with someone on the other side of the world, you’d need to find a secure way to send them the key before sharing your secure messages. If you already had a secure way to send someone an encryption key, then it stands to reason you would send your secure messages via that channel too, rather than using symmetric encryption in the first place. 

Obfuscation
obfuscated

The purpose of obfuscation is to make something harder to understand, usually for the purposes of making it more difficult to attack or to copy. One common use is the the obfuscation of source code so that it’s harder to replicate a given product if it is reverse engineered.

It’s important to note that obfuscation is not a strong control (like properly employed encryption) but rather an obstacle. It, like encoding, can often be reversed by using the same technique that obfuscated it. Other times it is simply a manual process that takes time to work through.

Another key thing to realize about obfuscation is that there is a limitation to how obscure the code can become, depending on the content being obscured. If you are obscuring computer code, for example, the limitation is that the result must still be consumable by the computer or else the application will cease to function.(source)

Summary

  • Encoding is for maintaining data usability and can be reversed by employing the same algorithm that encoded the content, i.e. no key is used.
  • Encryption is for maintaining data confidentiality and requires the use of a key (kept secret) in order to return to plaintext.
  • Hashing is for validating the integrity of content by detecting all modification thereof via obvious changes to the hash output.
  • Obfuscation is used to prevent people from understanding the meaning of something, and is often used with computer code to help prevent successful reverse engineering and/or theft of a product’s functionality. (source)

Ionic 1 vs Ionic 2 April 2016 : What should i use?

Hello again guys, after exploring ionic framework for several times, now let’s discuss about ionic 1 and ionic 2 (which is now is still in beta version, current beta 8).

I’ve been learing for the last 2 months (o my good, may be it took so long) *or because no progress on my project, i learn about ionic, both ioinic 1 and 2 (beta). I have 2 projects, at first, both using ionic 2, but at the end, my senior said the project would be in ionic 1 (stable) for development because we don’t have so much time and we need stable version that have everythings work well. As we know, in beta version some function still can’t be used (read,  http://blog.ionic.io/ ) and may be we don’t think much about migration.

As for my second project, until this time i still make it in ionic 2. Because we still have time to build, and we don’t need some complex function right now, we still develop from the very beginning. Have enough time to wait about ionic 2 issues. And with current beta version, we still had enaugh. Based on what i’ve read here.

Ionic 1 using angular 1, ionic 2 using angular 2. Here’s good article for you to read : http://www.joshmorony.com/7-reasons-why-ionic-2-is-better-than-ionic-1/

I’ll write some for you :

  1. Organization and Structure
    In Ionic 2, every page or component in your application has its own folder with its own class file, template file and style file. If I have two pages in my application, Home and About, I would have the following structure :

    • home
      • home.js
      • home.html
      • home.scss
    • about
      • about.js
      • about.html
      • about.scss

    While ionic 1 project collect all html files in templates folder, and all js files in js folder, but you can still organized your ionic project file just like the structure above, but it’s not the default style that was used. It would require prior knowledge and motivation to achieve a sensible and scalable structure like this in Ionic 1.

  2. Toolingionic g page mypage

    you run it from CLI, and you would have MyPage folder with the following :

    • mypage
      • mypage.js
      • mypage.html
      • mypage.scss

    With the Ionic 2 CLI you can automatically generate pages, providers, tabs, pipes, components and directives and it will set up all the files you need and some boiler plate code for you.

  3. Navigation
    with ionic 1 you need to define $stateProvider like this

    $stateProvider
      .state('intro', {
        url: '/',
        templateUrl: 'templates/mypage.html',
        controller: 'IntroCtrl'
      })

    and for ionic 2 , you can do it just like this
    this.nav.push(mypage);
    you can push a page onto the navigation stack to make it the current page, and you can pop a page to remove it from the navigation stack and go back to the previous page. Just like pushing and popping an array.

  4. Template syntax
    Ionic 1:

    1
    <img ng-src="{{photo.image}}" />

    Ionic 2:

    1
    <img [src]="photo.image" />

    The difference here is inconsequential really, but the second code block certainly looks cleaner. Here’s another example:

    Ionic 1:

    1
    <button ng-click="doSomething()">

    Ionic 2:

    1
    <button (click)="doSomething()">
  5. Building
    In Ionic 2 almost all of your coding will be done inside of the app folder, which is completely separate to the www folder which contains the code that is actually served to the browser. When you run an Ionic 2 application, the code in the app folder is automatically transpiled and bundled into a single Javascript file which is copied into the www folder and served. For the most part, you don’t have to touch your index.html file at all.

    Of course, you can read more about it here : http://www.joshmorony.com/7-reasons-why-ionic-2-is-better-than-ionic-1/ and Josh Morony also provide a good e-book for us to learn about ionic 2, it’s so helpful.  You can also buy it here : https://www.joshmorony.com/building-mobile-apps-with-ionic-2/?utm_source=homepage&utm_medium=banner&utm_campaign=incontent#buy

    Also, if you already have ionic 1 project, may be you want to read about ionic 2 migration here : http://ionicframework.com/docs/v2/getting-started/migration/

    Thanks for visiting my blog! Cheers ^^,

Create Simple Accordion with ionic and angular

Banyak trik bisa kita lakukan untuk membuat tampilan accordion, di jquery kita bisa tinggal pakai saja function yang ada. Nah kali ini saya mau share sedikit tentang ionic dan angular. Tapi kali ini saya melakukannya dengan ionic 1, karena memang sedang ada project dengan menggunakan framework ini meski pada beberapa post sebelumnya saya sempat ngeshare tentang ionic2, tenang, yang ionic 2 saya juga terus pakai kok, nanti akan saya share.

How to get start with Ionic 2

Choosing best mobile apps technology : native vs hybrid

About ionic creator

Ionic vs OnsenUI : UI Framework for Hybrid Mobile Apps 

How to install phonegap for android apps development

Kali ini, saya membuat tampilan accordion simple saja, saya tidak banyak cuma butuh 2, jadi untuk animasinya saya cukup pakai css. Saya menggunakan ng-show ini dari angular. Oke, langsung aja kita liat code nya

Sederhana, untuk header accordionnya saya cuma pakai list divider dari component ionic, tinggal saya modif sedikit seperti ini:

the html

<ion-item class=”item-icon-right item-divider”
ng-click=”toggleGroup(‘A’)”
ng-class=”{active: isGroupShown(‘A’)}”>
<i class=”icon” ng-class=”isGroupShown(‘A’) ? ‘ion-chevron-up icon-accessory’ : ‘ion-chevron-down icon-accessory'”></i>
List Group A
</ion-item>

<ion-list>

<!– ************************* LIST GROUP A *******************************************–>
<ion-item class=”item-remove-animate item-icon-right item-accordion” ng-repeat=”list in listdata” type=”item-text-wrap” ng-show=”isGroupShown(‘A’)” href=”#/detail”>
<h2>Barang {{list .name}}</h2>
<p>{{list .message}}</p>
<i class=”icon ion-chevron-right icon-accessory”></i>
</ion-item>
</ion-list>


itu untuk satu group, kalo mau nambah lagi tinggal tambahin code yang sama, cuma tinggal ganti nama grupnya aja itu misal jadi isGroupShown(‘B’). So its very simple, kalo mau yang lebih kompleks, bisa ja sih, but this is easier, hhaaaaaaa..

note : ini datanya saya ngambil dari service sederhana saja, cuma array :

.service(‘listdata’, function() {
return {
lists: [
{id: “1”,name : “A”,message: “Detail Informasi A”},
{id: “2”, name : “B”,message: “Detail Informasi B”},
{id: “3”, name : “C”,message: “Detail Informasi C”},
{id: “4”, name : “D”,message: “Detail Informasi D”},
{id: “5”, name : “E”,message: “Detail Informasi E”},
{id: “6”, name : “F”,message: “Detail Informasi F”}

],
getLists: function() {
return this.lists;
},
getList: function(listId) {
for(i=0;i<this.lists.length;i++) {
if(this.lists[i].id == listId) {
return this.lists[i];
}
}
}
}


okey, then the css; ini penting yah buat transisi pas itemnya dibuka dan ditutup, biar lebih halus, coba liat sendiri perbedannya yah, hapus aja line yang pertama dan bandingkan hasilnya..

.list .item.item-accordion {transition: 0.09s all linear;}
.list .item.item-accordion.ng-hide {line-height: 0px;}
.list .item.item-accordion.ng-hide-add,
.list .item.item-accordion.ng-hide-remove {display: block !important;}


and then the .js file tinggal taruh didalam controller nya saja:

$scope.shownGroup=null; //default nutup semua

$scope.isGroupShown = function(group) {
return $scope.shownGroup === group;
};
$scope.toggleGroup = function(group) {
if ($scope.isGroupShown(group)) {
$scope.shownGroup = null;
} else {
$scope.shownGroup = group;
}
};


Enjoyyy, atau kalian bisa mampir kesini -> https://codepen.io/ionic/pen/uJkCz

How to get start with Ionic 2

Now, i wanna share about how to start with ionic. Official site ; http://ionicframework.com/

Ionic 2 is still in beta release but, you may want to read about ionic 1 and 2 and should you upgrade to ionic 2 or not ->  here.

First of all you have to make sure this following things already installed to your computer :

  1. Android SDK
  2. Java JDK
  3. NodeJS
  4. AntJS
  5. Cordova Latest Version

And now, we’re ready to start about ionic. http://ionicframework.com/getting-started/

For you who just heard about ionic, you can visit my previos post about ionic right here.

We use Nodejs command line tools to run ionic command , you can read more here https://www.npmjs.com/package/ionic

  1. Install ionic
    $ npm install -g ionic@beta
  2. Create Project
    use –v2 to create ionic 2 project, if you do not add this line, it will install ionic 1 by default. ex : $ ionic start myApp ==> ionic 1 version

    $ ionic start myApp [template] --v2
    $ ionic start myApp tabs --v2 
    ionic create porject

    ionic create porject

    I can’t believe i’m having trouble when start ionic project, the installation is stuck on “installing npm packages…” this command try to call the npm packages source but i’ve been waiting for an hour and theres nothing changed. I terminated it, and then try to start a project test again and still the same. My friend, Hadi, wait for it, so long but end up with an error. My senior said, how about restart the PC? Then me and my friend doing that, and still failed. And then, we both try to uninstall the cordova, the ionic again and when start project it is still failed. We spent the day by doing that and still not working. I can’t believe i had something trouble like this, so frustating and finally,  i think this is about the connection -_- Okay, i start again this day. And i try to use my own connection instead of office’s. And i am get through it. Oh my god, i can’t belive, my senior said: ya, because office connection is too slow -_-

  3. Add platform
    $ cd myApp
    $ ionic platform add android
    
    $ ionic build android
    
    Oh, and let me show you my ionic info by run this command -> $ ionic info

    ionic info

    ionic info

  4. Emulate project
    $ ionic emulate android
    
    
  5. Run Project
    $ ionic run android
    
    
  6. Run in browsers
    $ ionic serve or $ ionic serve lab
    
    Next, i have to learn the components~ okay, noted! start from today yo! :D
  7. And here some commands that can help you :
    $ ionic g page detail -> will generate your page named 'detail' . A folder 'detail' and by contain detai.html, detail.js and detail.scss like this one :
    
    g page
    
    $ ionic g provider mydata -> will add new file named "mydata.js" under provider folder
    

    provider

Mudahnya Membuat Prototype Mobile App Dengan Ionic Creator

Hi, semuanya..

Lama saya tidak menulis, kali ini saya akan membahas tentang ionic framework!

Yah, saya tertarik dengan framwork yang satu ini, utamanya soal desainnya yang native-like, mendekati native. Saat ini, ionic sendiri memang masih beta (http://blog.ionic.io/announcing-ionic-framework-2-beta/) Namun ionic merupakan framework yang bagus dan membuat saya tertarik, sehingga saya jadi rajin mengunjungi lamannya. Saya juga  sudah mencoba beberapa aplikasi yang dibuat dengan ionic, dan memang hasilnya bagus ya, just like native.

Seperti yang saya utarakan tadi, saya akan lebih membahas soal desain, ada apa sih dengan desain di ionic?

Perkenalkan, creator ionic!

https://creator.ionic.io

Creator is a drag-&-drop prototyping tool for creating great apps using Ionic, with just a click of the mouse.

Pertama, buka laman https://creator.ionic.io kemudian, sign up account. Setelah itu kita akan masuk dashboard kemudian, tinggal klik new project! Start using creator! 😀

Screenshot_2

And this is your dashboard :

mylovelycode - creator ionic

mylovelycode – creator ionic

Yups, tinggal drag and drop aja components yang kamu mau. Mudah kan? Seperti di android studio atau eclipse ya untuk desain formnya. Tapi ini lebih mudah dan simple! Oya untuk hasil desain kita, ada 4 pilihan yang disediakan, seperti dibawah ini. Tinggal pilih, mau yang mana? 😀

Screenshot_1

Onsen UI vs Ionic Framework for Hybrid Mobile Apps

Hello Guys, hmm.. Yesterday, one of my friend ask me how to work with mobile apps, how to start ? A very good designer with a very good design product. He also a game developer, and build game using HTML5 and javaScript. He want to build a mobile application to discover some nice place to hang out. Need to display maps, and he want to work with AngularJS.

So, i think he sould try to build a hybrid apps. Why hybrid? Cz formerly he work with html5+css+angular and hybrid apps alows you to work with it, cz its build in a webView. So it is easier to adapt, instead of build a native apps.

But, what is hybrid mobile apps? Okay, i find a nice quote to help you understand :

Hybrid mobile apps are like any other apps you’ll find on your phone. They install on your device. You can find them in app stores.

Like the websites on the internet, hybrid mobile apps are built with a combination of web technologies like HTML, CSS, and JavaScript. The key difference is that hybrid apps are hosted inside a native application that utilizes a mobile platform’s WebView. (You can think of the WebView as a chromeless browser window that’s typically configured to run fullscreen.) This enables them to access device capabilities such as the accelerometer, camera, contacts, and more.

In easy way, its a webview application (just like you see in other web browser like chrome), it is viewed in full screen, and the url is  hidden, and it is installed on your mobile phone 😀 Get it?

Ah, and why you should try with hyrbid apps? You can take a look and read this nice article : http://developer.telerik.com/featured/what-is-a-hybrid-mobile-app/

Oh ya, and hybrid apps is cross-paltform. So you can build on android, iOS, Blackberry ect. For me, i’ve try to build it on android and iOS. Still, to build iOS app, you need MAC with its XCode to compile your apps on your phone 😀

And, how to build it ? You can start form installing phonegap to try. Apache cordova  is a platform that provides a consistent set of JavaScript APIs to access device capabilities through plug-ins, which are built with native code. I already wrote an article about it and you can find it here https://mylovelycode.wordpress.com/2015/05/06/cara-menginstall-phonegap-untuk-android-apps-development/

But, in this article, actually i want to talk about the framework. A sets of UI components that can help you to build hybrid mobile apps. I read some article and found 2 framework that most popular. And then i found some issue form the developers who confuse :  to decide which is better? Which one i should use for my applications?

For me, i’ve try both of them : Onsen and Ionic. I’ve download onsen and try to make a little project to try it. Oh, and it is so lightweight when i install it on my phone, smooth animation and easy to use it. As for ionic, i just try to install demo version on my phone, it also lighweight. But, i prefer onsen still, cz i think it has nice ui sets, hehe. And i think its easier for my friend since he knows a lot about JavaScipt, AngularJS, so, he can adapt from web apps to mobile apps 😀

Ahh, and i found this good answer, so i quote it

One year has passed since both frameworks are available on the market. Onsen UI is currently in stable 1.2 version while Ionic is in the last release candidate state.
I have worked with both of them so let me give you a short overview, I also wrote a much larger blog article, you’ll find it at the end of this answer.
I won’t go into much details about the core framework; if you have a previous AngularJS knowledge you will easily transition to Ionic or Onsen UI.

  • Both frameworks are built around AngularJS and they heavily depend on directives, you can also easily build your own custom directives. Onsen UI also features a jQuery support (unnecessary if you ask me).
  • Both frameworks support Android 4+, iOS 6+ (some features are available on Android 2.3), Onsen UI also officially supports Firefox OS and desktop browsers. Ionic don’t have an official desktop support, but it will still work (it will not be pretty, imagine ).
  • Ionic currently don’t support Windows Mobile platform (it will have it in the future), Onsen UI support is currently in development (since November 2014).
  • Both frameworks support some kind of splitview feature so they can be used for table development.
  • Both frameworks have a distinctive nice looking flat UI. I prefer Ionic over Onsen UI look and feel, but this is a matter of personal taste. Both default themes look iOS 7 like.
  • Onsen UI supports native looking themes for Android and iOS. Ionic framework uses the same theme for all platforms, but some features will depend on the platform (for example tab look and feel)
  • Both frameworks have a working theme builder.
  • Ionic supports SASS while Onsen UI is built around Topcoat CSS library.
  • Both frameworks have a large widget support (directives)
  • Onsen UI has a better documentation. It is separated at two different locations. First one is “Components” where you can see different directives and each one has a working example you can use and replicate. Second part is a “Guide” where you are guided through the application creation process.
  • Ionic has a disorganized documentation (heavily fragmented). It lacks a real “getting started” tutorial, even if you have previous AngularJS experience. It shows you pieces, but not how to connect them correctly.
  • On the other hand Ionic has much larger community so you will easily find problem solutions.
  • Ionic framework has a great official forum + large StackOverflow community. At the same time, Onsen UI uses only StackOverflow as a help center (I would call this a fail).
  • Onsen UI has an HTML5 IDE called MONACA IDE (great tool), Ionic IDE is currently in production, you can participate in beta test.
  • Ionic has a growing 3rd party plugin community (for example date picker), I couldn’t find any 3rd party Onsen UI plugin

I wrote a much larger article covering Ionic / Onsen UI changes, find ithere.


And finally, which one you decide to use?

Ahh, and for question form my friend : how do i start ? And my answer is :

  1. Try to install phonegap untill you can successfully install .apk.
  2. For android, since this is hybrid apps, i prefer use genymotion as emulator.
  3. Not only on the emulator, but try to install it directly on your phone.
  4. Try to download and isntall the framework ( Have you decide it? hha )
  5. Is it can work with angular? Oh yeah of coure yes. Onsen and ionic both built in angular, so, absolutey yes! Just do it like you do on web apps.
  6. Try to viewing maps on your apps
  7. Server side? Lets read about webservice API. It use http response, and for client side you can request data with ajax.
  8. Oh, last but not least. Instead of build on emulator/hp each time you make a change and want to see it works, you bettertry to emulate in chrome 😀 Chrome have a very good device emulator. Right click -> Inspect Elemet -> On the left the is icon seacrh, and then icon “mobile phone” just click it and you will see, also you can choose many model device on it.

Taraaaaa…. Next, build your own applications 😀

Keuntungannya pakai framework ya lebih mudah, lebih cepet kan tinggal pakai UI sets yang disediakan, dan yang peling penting animasi2 seperti pull down, slide, transition itu udah ada, jadi ga perluu repot2 bikin animasi *kalo aku dulu repot karna cuma pakai jquery dan dibantu dengan css3 untuk bikin animasi2, itu pun patah2, nggak smooth jadinya setelah diinstall di hape :(*

Some nice site/article for you :

https://onsen.io/

http://www.gajotres.net/best-html5-mobile-app-frameworks-onsen-ui/

http://stackoverflow.com/questions/23715679/onsen-ui-angular-js-google-maps

http://onsen.io/blog/onsen-ui-tutorial-angularjs-essentials-for-using-onsen-ui-part-1/

http://ionicframework.com/

http://phonegap.com/2012/03/19/phonegap-cordova-and-what%E2%80%99s-in-a-name/

http://www.drdobbs.com/web-development/restful-web-services-a-tutorial/240169069

http://rest.elkstein.org/