D3.js : SELECTION

I am totally newbie in D3, so don’t expect me to share an advance tutorial for D3 XD I am still learning and this post would just be my another self-notes, wherever or whenever i need it :’)

This would be my first post about D3, and i just wanna share about what i think it’s important if you wanna start learning D3. Well, actually when i first try it, just look at the library, check the examples, download the code and try to run it inside my project. And it works fine. But, when i wanna go deeper about D3, like, you know, start to customize the view, i need to learn more about it and what i got first, i think about it’s Selection; I think it’s an important thing since to modify element, syling or adding event/action, i need to learn how i make selection to the element i want first.

Well, i’m not start by ‘how to make the chart/element’ bcz, as you know, i just download some chart already on github or bl.ocks.org/d3indepth XD sorry. But if you interested, you can visit this helpfull article right here : https://www.dashingd3js.com/

Okay, so we’ll start. I am already make the graph, like forced-directed graph, consist of nodes and links (the line to connect the nodes). And, i start to customize it. D3 selections allow DOM elements to be selected in order to do something with them, be it changing style, modifying their attributes, performing data-joins or inserting/removing elements. (http://d3indepth.com/selections/) – btw you should visit the site, it really helpful. In D3 we use SVG element.

Scalable Vector Graphics (SVG)

Scalable Vector Graphics (SVG) is a family of specifications for creating two-dimensional vector graphics. Vector graphics are not created out of pixels. Vector graphics are created with paths having a start and end point, as well as points, curves and angles in between. Since Vector Graphics are not created out of pixels, they can be scaled up to larger or smaller sizes without losing image quality.

SVG images and their behaviors are defined in XML text files. The XML text can be included in an HTML document. This text means that images can be created and edited in a text editor. Also, since the DOM includes XML as part of the DOM specification, we can use the DOM Tree to access and update the structure, content and style of SVG Images.

SVG comes with a basic set of shape elements:

  • Rectangle
  • Circle
  • Ellipse
  • Straight Line
  • Polyline
  • Polygon

Okay, i already make a force-directed-graph that looks like this :

D3 – forced network

Okay, it’s only circles (nodes) and links btw. But if you learn D3, you will need to check the element inspector ( i prefer use chrome). Why? Because it will help us to make selection. As you see on D3, we just write code like this :

var svg = d3.select("svg"),
width = +svg.attr("width"), height = +svg.attr("height");  

var node = g.append("g")
.attr("class", "nodes")
.selectAll("circle")
.data(nodes_data)
.enter()
.append("circle")
.attr("r", radius)
.attr("fill", circleColour);

and the result is as you can see above ( on the picture), but then we check inspector, and we got like this :

circle d3

Elements

You can see the <g> tag , it is the SVG Group Element is a container that contains all child SVG elements defined inside of it and that share the same attribute. In the example, it have 2 groups. One contains lines and the others contain circles. And there’s many circle elements that created with D3, we use .append("circle")and its populate the element as we can see in the element inspector.

D3 has two functions to make selections d3.select and d3.selectAll.

d3.select selects the first matching element whilst d3.selectAll selects all matching elements. Each function takes a single argument which specifies the selector string. Examples, we want to select all the circles, we can use d3.selectAll(“circle”); And when we use d3.select(“circle”); it will select the first matching element, only one, the first one. In my example, it is the line that i blocked. We can also select item by it class like d3.selectAll(“.classname”);

We can also updating the elements with functions, like this :

d3.selectAll('circle')
  .attr('cx', function(d, i) {
    return i * 100;
  });

The function typically accepts two arguments d and i. The first argument d is the joined data and i is the index of the element within the selection. If we want to update elements in a selection according to their position within the selection, we can use the iargument. For example to position some rect elements horizontally we can use: (http://d3indepth.com/selections/)

When i added events,  i add a function and i want to change radius of the element i clicked (for example) i can use “this“, so it will look like :

d3.select(this); and i can also modify element, like d3.select(this).attr('radius', 10);

d3 styling change radius

d3 styling change radius

We can also make selection like this:

// Add .selected class to 3rd circle
d3.select('circle:nth-child(3)')
	.classed('selected', true);

// Set checked property of checkbox
d3.select('input.robot-checkbox')
	.property('checked', true);

So it will just modify the element clicked, and change radius to 10.  You can also adding text, title, or changing the color, add borders etc, but i will write more about modifying element and styling on my next post ! See youu very sooon 🙂

How to Generate Signed APK – Android Studio

This is another note for me, hehe. This is step from make new key and make signed apk.

  1. In the menu bar, Click Build > Generate Signed APK
  2. Click Create New

    • Key store path: Select the location where your keystore should be created.
    • Password: Create and confirm a secure password for your keystore. On the new keystore, we must fill the form.
    • Alias: Enter an identifying name for your key.
    • Password: Create and confirm a secure password for your key. This should be different from the password you chose for your keystore
    • Validity (years): Set the length of time in years that your key will be valid. Your key should be valid for at least 25 years, so you can sign app updates with the same key through the lifespan of your app.
    • Certificate: Enter some information about yourself for your certificate. This information is not displayed in your app, but is included in your certificate as part of the APK.
  3. Select apk destination folder, build type : release. Choose signature version and then click Finish!
  4. Open in File explorer, and there is your signed APK : yourprojectname/app/build/outputs/apk /app-release.apk
  5. Done!

It’s a very short post but thank you for visit.

Generate CRUD in Yii Project using Gii

This time, i will share about how to Generate code with Gii – in Yii Framework.

Last time, i got some projects, web based and i decided to use Yii to saved time. Bcz its easier, and provides Crud Generator , so it will make it faster in this short-time project. And, i use yii bcz it’s more familiar for me. And this is just a note for my self so dont hv to browse again.

  1. Make sure you already have database, and make your table. Ex: User
  2. Open URL : http://localhost/[YOUR_PROJECT_NAME]/gii/default/login
    use your login password, that you can find on config folder/ main.php, on this line :
    uncomment this line and just change your password:
    ‘gii’=>array(
    ‘class’=>’system.gii.GiiModule’,
    ‘password’=>’YOURPASSWORD HERE’,
    // If removed, Gii defaults to localhost only. Edit carefully to taste.
    ‘ipFilters’=>array(‘127.0.0.1′,’::1′),
    ),
  3. Click Generate Model -> Fill the texfield with your table name , ex “user” -> Click Preview -> Generate
  4. Click Generate Crud -> Type your model class name -> ex: “User” -> Click Preview -> Generate. When you’re on this step, its done.
  5. Test with access URL : http://localthost/user
    Ups, never let your password shown like that!
  6. Finish! Thanks!

Dependency Injection and Reflection

Yesterday i got some discussion with my Uncle, about mobile application (again) and got some issue about the app i want to build. Then the discussion drives us  into “Dependency Injection and Reflection“. My uncle said, i have to minimalize my code, he said i have to ensure that i  split the code in individual component that can be run without have any dependency with the other component.  Separate it.

Try dependency injection and reflection.” That’s the code my uncle said, and then it means”cari dan pelajari sendiri” As usual.  Oke, feni, you’re strong enaugh.

So let’s start gooling and found some good artcile. I don’t mind what programming language to describe dependency injection, i also use different language to my different apps.

“Jangan mengotak-kotakkan dirimu hanya dalam satu bahasa pemrograman, yang penting paham logicnya. Insya Allah yang lain juga bisa. Fenifa 2017”

In software engineering, Dependency Injection is a design principle in which code creating a new object supplies the other objects that the new object depends upon for operation. This is a special case of inversion of control. Often a dependency injection framework (or “container”) is used to manage and automate the construction and lifetimes of interdependent objects.

A dependency is an object that can be used (a service). An injection is the passing of a dependency to a dependent object (a client) that would use it. The service is made part of the client’s state. Passing the service to the client, rather than allowing a client to build or find the service, is the fundamental requirement of the pattern.

Dependency injection separates the creation of a client’s dependencies from the client’s behavior, which allows program designs to be looselycoupled and to follow the dependency inversion and single responsibility principles. It directly contrasts with the service locator pattern, which allows clients to know about the system they use to find dependencies.

An injection, the basic unit of dependency injection, is not a new or a custom mechanism. It works in the same way that “parameter passing” works. Referring to “parameter passing” as an injection carries the added implication that it’s being done to isolate the client from details.

An injection is also about what is in control of the passing (never the client) and is independent of how the passing is accomplished, whether by passing a reference or a value.

Dependency injection involves four roles:

  • the service object(s) to be used
  • the client object that is depending on the services it uses
  • the interfaces that define how the client may use the services
  • the injector, which is responsible for constructing the services and injecting them into the clien

(source)

Dependency injection simply means receiving collaborators as constructor parameters instead of fetching them ourselves. (source)

Reflection is the ability to introspect and reverse engineer functions, classes, methods and interfaces during runtime. This makes it possible to find specific information about your code, such as a classes internal properties, methods & even doc blocks for those methods.

One of my favourite uses for the Reflection API is to have all of my class dependencies automatically injected when possible. If you’re new to dependency injection, then don’t worry, it’s quite simple. This makes my code cleaner to look at, and far more maintainable as the codebase grows. We’ve recently updated our company starter theme/framework to do just this. I figure it’s something I can show you how to do to. The full code & example can be found at the bottom of this post (TL/DR). (source)

Problem Installing Oracle Developer Suite 10g on Windows 10 64 bit

Today i’m trying to install Oracle Developer Suite 10g on my laptop, OS Windows 10 64bit and i’m having some trouble. I’ve extract developer suite disk1 and disk2.rar, and try double click on setup.exe but getting some errors. I already fix it, but i think it would be nice if i write it here, may be can be useful for others who facing the same problem during the instalation oracle developer suite.

What i have :

  1. OracleXE 11g
  2. Orcle DevSuite 11g Disk1 and Disk2
  3. jInit
  4. Windows 10

#ERROR 1

It’s appear on cmd like this :Starting Oracle Universal Installer…
Checking installer requirements…
Checking operating system version: must be 5.0, 5.1 or 5.2 . Actual 6.1
Failed <<<<

Then appears form that says would i like to install in compability mode? I click yes. The instalation started again, then i find the next errors :

Checking monitor: must be configured to display at least 256 colors . Actual
4294967296 Passed
Checking swap space: 0 MB available, 1535 MB required. Failed <<<<
Some requirement checks failed. You must fulfill these requirements before
continuing with the installation, at which time they will be rechecked.
Continue? (y/n) [n]

I type ‘y’ and it works, it drives me into instalation form, i click next next but, again, i have problem that says “Install has encoontered an error while attempting to verify your virtual memory setting. please verify that the sum of the initial sizes of the paging files is atleast 256 MB”

I start to search the same issue on google and find this thread that helps me a lot. https://community.oracle.com/thread/2444486

 have to remember that Oracle Developer Suite (ODS) 10g was written before well before Windows 7. Officially, ODS 10g is not Oracle Certified or supported on Windows 7 64-bit. Having said that, it can be made to work – relatively easy. Following these steps to install:
1. As you have discovered, ODS 10g installer can’t check Virtual Memory (VM) when it is managed by Windows. Therefore, you have to change the VM to specific sizes for the ODS installer to be able to read the settings. I recommend you set the Minimum to 2048 and the Max to 4096. Once the installation is complete, you can change VM back to Windows Managed.

Here step by step to change the size of virtual memory i found : http://mywindowshub.com/customization-virtual-memory-size-windows-10-technical-preview/

2. The ODS installer also checks for specific versions of Windows. The next error you would have gotten is that the installer needs Windows 5.0, 5.1, 5.2 or 5.3. You have to set the compatibility option to Windows XP service pack 3. Also, Oracle products are not designed to use “Least Privileges” so you must explicitly run the installer as Administator.

To set the compatibility and run-as –

 – Right-Click on the Setup.exe and select Properties
 – Choose Compatability tab => Compatability Mode
 – Select “Run this program in compatability mode for : Windows XP (Service Pack 3).
 – While in the Compatability Tab – also check the “Run this program as an administrator” as well.
#ERROR 2
I following the step, so far it works but then i got another errorrs (Oh, God!) Environment Path. It says that ” The value of the environtment variable PATH is more than 1023 characters, this value can not be set.”
It says that i need to remove some value path to reduce sthe size.
I need to copy text in variable path, delete some value, save it and continue instalation until it’s completed. Then, i can add again the value i’ve removed before, and it works! Thanks!
#ERROR 3 
ORA12560 : TNS protocol adapter error
Instalation is finished and i can open my oracle form builder, ready to create new form. But, when i try to connect to database, it gives me error TNS Protocol Adapter Error. After do some browsing here and there, i solve my problem by adding local service connaction in Net Manager.
Just type Net Manager on search windows, choose Oracle Net Configuration – Service Naming – click add button.
Fill net service name, and follows the instruction. At the end, you have to test connection. At first it will give error, klik change login button and fill login information with your login account, clik test again, if successfull, click finish.
#ERROR4
Okay, i can connect oracle form to database, but, here the new problem i got :  FRM-10142: The HTTP Listener is not running on -blablabla- at port 8889.
To solve this issue was very simple, just type ocj4 on your start windows, click Start OC4J instance, just wait until it fully started. Then, try to run oracle form again, wohooo! it’s success, after all this time facing some errorrs, finally i can do it!
Lessons :
“To me every hour of the light and dark is a miracle; every cubic inch of space is a miracle.”
-Walt Whitman (1819-1892)

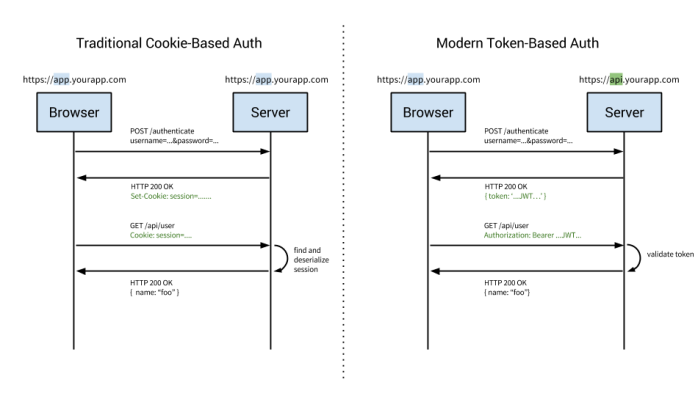
Getting Auth with Cookie vs Token | AngularJS

These last few days, i’ve been working with AngularJS, dealing with RESTFull-API concept in my back end. And now, i learn to get auth with AngularJS.
The scenario is, when user login, i’ll send username and password, server with validate user credentials and send the auth that must be saved and for the next request, i had send the auth. Ok, and it drives me into Cookies vs Token. Which one i’ll use?

My senior do some research and decided to try with cookie first. But, i still want to share about this matter.

Good articles is here : http://www.angulartutorial.net/2014/05/set-headers-for-all-http-calls-in.html and http://www.webdeveasy.com/interceptors-in-angularjs-and-useful-examples/

Ya, there some word about interceptors :

Interceptors allow you to:

  • Intercept a request by implementing the request function: This method is called before $http sends the request to the backend, so you can modify the configurations and make other actions. This function receives the request configuration object as a parameter and has to return a configuration object or a promise. Returning an invalid configuration object or promise that will be rejected, will make the $http call to fail.
  • Intercept a response by implementing the response function: This method is called right after $http receives the response from the backend, so you can modify the response and make other actions. This function receives a response object as a parameter and has to return a response object or a promise. The response object includes the request configuration, headers, status and data that returned from the backend. Returning an invalid response object or promise that will be rejected, will make the $http call to fail.
  • Intercept request error by implementing the requestError function: Sometimes a request can’t be sent or it is rejected by an interceptor. Request error interceptor captures requests that have been canceled by a previous request interceptor. It can be used in order to recover the request and sometimes undo things that have been set up before a request, like removing overlays and loading indicators, enabling buttons and fields and so on.
  • Intercept response error by implementing the responseError function: Sometimes our backend call fails. Other times it might be rejected by a request interceptor or by a previous response interceptor. In those cases, response error interceptor can help us to recover the backend call.

I found a good article here and here.

What are the benefits of using a token-based approach?

  • Cross-domain / CORS: cookies + CORS don’t play well across different domains. A token-based approach allows you to make AJAX calls to any server, on any domain because you use an HTTP header to transmit the user information.
  • Stateless (a.k.a. Server side scalability): there is no need to keep a session store, the token is a self-contanined entity that conveys all the user information. The rest of the state lives in cookies or local storage on the client side.
  • CDN: you can serve all the assets of your app from a CDN (e.g. javascript, HTML, images, etc.), and your server side is just the API.
  • Decoupling: you are not tied to a particular authentication scheme. The token might be generated anywhere, hence your API can be called from anywhere with a single way of authenticating those calls.
  • Mobile ready: when you start working on a native platform (iOS, Android, Windows 8, etc.) cookies are not ideal when consuming a secure API (you have to deal with cookie containers). Adopting a token-based approach simplifies this a lot.
  • CSRF: since you are not relying on cookies, you don’t need to protect against cross site requests (e.g. it would not be possible to <iframe> your site, generate a POST request and re-use the existing authentication cookie because there will be none).
  • Performance: we are not presenting any hard perf benchmarks here, but a network roundtrip (e.g. finding a session on database) is likely to take more time than calculating an HMACSHA256 to validate a token and parsing its contents.
  • Login page is not an special case: If you are using Protractor to write your functional tests, you don’t need to handle any special case for login.
  • Standard-based: your API could accepts a standard JSON Web Token (JWT). This is a standard and there are multiple backend libraries (.NET, Ruby, Java, Python, PHP) and companies backing their infrastructure (e.g. Firebase, Google, Microsoft). As an example, Firebase allows their customers to use any authentication mechanism, as long as you generate a JWT with certain pre-defined properties, and signed with the shared secret to call their API.

Ya, as you see, JSON Web Token is quite popular i think, and you can see some example here : https://auth0.com/learn/token-based-authentication-made-easy/

Encoding vs Hashing vs Encrypting vs Obfuscation

Hi all, i wanna share my little experience. I’m still working with ionic.

Now, i learn about data security in mobile application. I learn from the very basic, and it drives me into data encryption. I build a little application to explore. The condition is : this application will work offline and online. When it works offline, the data will saved on the phone storage (local). This can be done by using sqlite (for example). And, the data is so important so we want to protect.

As the authentication i just use basic auth, nice artikel is here https://luckymarmot.com/paw/doc/auth/basic-auth and i still learning to use JWT (JSON Web Token) for authentication, login credentials etc. Next time, i’ll share. Now, i wanna talk about encode, hash and encrypt. I’ve read some article and i’ll share it with you.

Encoding

The purpose of encoding is to transform data so that it can be properly (and safely) consumed by a different type of system, e.g. binary data being sent over email, or viewing special characters on a web page. The goal is not to keep information secret, but rather to ensure that it’s able to be properly consumed.

Encoding transforms data into another format using a scheme that is publicly available so that it can easily be reversed. It does not require a key as the only thing required to decode it is the algorithm that was used to encode it.

Examples: ASCII, Unicode, URL Encoding, Base64

(source)

Hashing

Hashing is a type of algorithm which takes any size of data and turns it into a fixed-length of data.  Hashing is a one way function. It’s irreversible, you apply the secure hash algorithm and you cannot get the original string back.

Some hashing algorithms:

  • MD-5
  • SHA-1
  • SHA-2
  • SHA-3

When to use hash? 

We can use it to store password, as hashes are inherently one-way in their nature. By storing passwords in hash format, it’s very difficult for someone with access to the raw data to reverse it (assuming a strong hashing algorithm and appropriate salt has been used to generate it). 

When storing a password, hash it with a salt, and then with any future login attempts, hash the password the user enters and compare it with the stored hash. If the two match up, then it’s virtually certain that the user entering the password entered the right one.

Encrypting

Encryption turns data into a series of unreadable characters, that aren’t of a fixed length. The key difference between encryption and hashing is that encrypted strings can be reversed back into their original decrypted form if you have the right key. 

There are two primary types of encryption, symmetric key encryption and public key encryption. In symmetric key encryption, the key to both encrypt and decrypt is exactly the same. This is what most people think of when they think of encryption. 

Public key encryption by comparison has two different keys, one used to encrypt the string (the public key) and one used to decrypt it (the private key). The public key is is made available for anyone to use to encrypt messages, however only the intended recipient has access to the private key, and therefore the ability to decrypt messages.

Popular algorithm : 

  • AES – AES is the “gold standard” when it comes to symmetric key encryption, and is recommended for most use cases, with a key size of 256 bits.
  • PGP – PGP is the most popular public key encryption algorithm
  • RSA
  • DES

When should be used?

The purpose of encryption is to transform data in order to keep it secret from others, e.g. sending someone a secret letter that only they should be able to read, or securely sending a password over the Internet. Rather than focusing on usability, the goal is to ensure the data cannot be consumed by anyone other than the intended recipient(s).

If you have a usecase where you have determined that encryption is necessary, you then need to choose between symmetric and public key encryption. Symmetric encryption provides improved performance, and is simpler to use, however the key needs to be known by both the person/software/system encrypting and decrypting data.

If you were communicating with someone on the other side of the world, you’d need to find a secure way to send them the key before sharing your secure messages. If you already had a secure way to send someone an encryption key, then it stands to reason you would send your secure messages via that channel too, rather than using symmetric encryption in the first place. 

Obfuscation
obfuscated

The purpose of obfuscation is to make something harder to understand, usually for the purposes of making it more difficult to attack or to copy. One common use is the the obfuscation of source code so that it’s harder to replicate a given product if it is reverse engineered.

It’s important to note that obfuscation is not a strong control (like properly employed encryption) but rather an obstacle. It, like encoding, can often be reversed by using the same technique that obfuscated it. Other times it is simply a manual process that takes time to work through.

Another key thing to realize about obfuscation is that there is a limitation to how obscure the code can become, depending on the content being obscured. If you are obscuring computer code, for example, the limitation is that the result must still be consumable by the computer or else the application will cease to function.(source)

Summary

  • Encoding is for maintaining data usability and can be reversed by employing the same algorithm that encoded the content, i.e. no key is used.
  • Encryption is for maintaining data confidentiality and requires the use of a key (kept secret) in order to return to plaintext.
  • Hashing is for validating the integrity of content by detecting all modification thereof via obvious changes to the hash output.
  • Obfuscation is used to prevent people from understanding the meaning of something, and is often used with computer code to help prevent successful reverse engineering and/or theft of a product’s functionality. (source)

Ionic 1 vs Ionic 2 April 2016 : What should i use?

Hello again guys, after exploring ionic framework for several times, now let’s discuss about ionic 1 and ionic 2 (which is now is still in beta version, current beta 8).

I’ve been learing for the last 2 months (o my good, may be it took so long) *or because no progress on my project, i learn about ionic, both ioinic 1 and 2 (beta). I have 2 projects, at first, both using ionic 2, but at the end, my senior said the project would be in ionic 1 (stable) for development because we don’t have so much time and we need stable version that have everythings work well. As we know, in beta version some function still can’t be used (read,  http://blog.ionic.io/ ) and may be we don’t think much about migration.

As for my second project, until this time i still make it in ionic 2. Because we still have time to build, and we don’t need some complex function right now, we still develop from the very beginning. Have enough time to wait about ionic 2 issues. And with current beta version, we still had enaugh. Based on what i’ve read here.

Ionic 1 using angular 1, ionic 2 using angular 2. Here’s good article for you to read : http://www.joshmorony.com/7-reasons-why-ionic-2-is-better-than-ionic-1/

I’ll write some for you :

  1. Organization and Structure
    In Ionic 2, every page or component in your application has its own folder with its own class file, template file and style file. If I have two pages in my application, Home and About, I would have the following structure :

    • home
      • home.js
      • home.html
      • home.scss
    • about
      • about.js
      • about.html
      • about.scss

    While ionic 1 project collect all html files in templates folder, and all js files in js folder, but you can still organized your ionic project file just like the structure above, but it’s not the default style that was used. It would require prior knowledge and motivation to achieve a sensible and scalable structure like this in Ionic 1.

  2. Toolingionic g page mypage

    you run it from CLI, and you would have MyPage folder with the following :

    • mypage
      • mypage.js
      • mypage.html
      • mypage.scss

    With the Ionic 2 CLI you can automatically generate pages, providers, tabs, pipes, components and directives and it will set up all the files you need and some boiler plate code for you.

  3. Navigation
    with ionic 1 you need to define $stateProvider like this

    $stateProvider
      .state('intro', {
        url: '/',
        templateUrl: 'templates/mypage.html',
        controller: 'IntroCtrl'
      })

    and for ionic 2 , you can do it just like this
    this.nav.push(mypage);
    you can push a page onto the navigation stack to make it the current page, and you can pop a page to remove it from the navigation stack and go back to the previous page. Just like pushing and popping an array.

  4. Template syntax
    Ionic 1:

    1
    <img ng-src="{{photo.image}}" />

    Ionic 2:

    1
    <img [src]="photo.image" />

    The difference here is inconsequential really, but the second code block certainly looks cleaner. Here’s another example:

    Ionic 1:

    1
    <button ng-click="doSomething()">

    Ionic 2:

    1
    <button (click)="doSomething()">
  5. Building
    In Ionic 2 almost all of your coding will be done inside of the app folder, which is completely separate to the www folder which contains the code that is actually served to the browser. When you run an Ionic 2 application, the code in the app folder is automatically transpiled and bundled into a single Javascript file which is copied into the www folder and served. For the most part, you don’t have to touch your index.html file at all.

    Of course, you can read more about it here : http://www.joshmorony.com/7-reasons-why-ionic-2-is-better-than-ionic-1/ and Josh Morony also provide a good e-book for us to learn about ionic 2, it’s so helpful.  You can also buy it here : https://www.joshmorony.com/building-mobile-apps-with-ionic-2/?utm_source=homepage&utm_medium=banner&utm_campaign=incontent#buy

    Also, if you already have ionic 1 project, may be you want to read about ionic 2 migration here : http://ionicframework.com/docs/v2/getting-started/migration/

    Thanks for visiting my blog! Cheers ^^,

Create Simple Accordion with ionic and angular

Banyak trik bisa kita lakukan untuk membuat tampilan accordion, di jquery kita bisa tinggal pakai saja function yang ada. Nah kali ini saya mau share sedikit tentang ionic dan angular. Tapi kali ini saya melakukannya dengan ionic 1, karena memang sedang ada project dengan menggunakan framework ini meski pada beberapa post sebelumnya saya sempat ngeshare tentang ionic2, tenang, yang ionic 2 saya juga terus pakai kok, nanti akan saya share.

How to get start with Ionic 2

Choosing best mobile apps technology : native vs hybrid

About ionic creator

Ionic vs OnsenUI : UI Framework for Hybrid Mobile Apps 

How to install phonegap for android apps development

Kali ini, saya membuat tampilan accordion simple saja, saya tidak banyak cuma butuh 2, jadi untuk animasinya saya cukup pakai css. Saya menggunakan ng-show ini dari angular. Oke, langsung aja kita liat code nya

Sederhana, untuk header accordionnya saya cuma pakai list divider dari component ionic, tinggal saya modif sedikit seperti ini:

the html

<ion-item class=”item-icon-right item-divider”
ng-click=”toggleGroup(‘A’)”
ng-class=”{active: isGroupShown(‘A’)}”>
<i class=”icon” ng-class=”isGroupShown(‘A’) ? ‘ion-chevron-up icon-accessory’ : ‘ion-chevron-down icon-accessory'”></i>
List Group A
</ion-item>

<ion-list>

<!– ************************* LIST GROUP A *******************************************–>
<ion-item class=”item-remove-animate item-icon-right item-accordion” ng-repeat=”list in listdata” type=”item-text-wrap” ng-show=”isGroupShown(‘A’)” href=”#/detail”>
<h2>Barang {{list .name}}</h2>
<p>{{list .message}}</p>
<i class=”icon ion-chevron-right icon-accessory”></i>
</ion-item>
</ion-list>


itu untuk satu group, kalo mau nambah lagi tinggal tambahin code yang sama, cuma tinggal ganti nama grupnya aja itu misal jadi isGroupShown(‘B’). So its very simple, kalo mau yang lebih kompleks, bisa ja sih, but this is easier, hhaaaaaaa..

note : ini datanya saya ngambil dari service sederhana saja, cuma array :

.service(‘listdata’, function() {
return {
lists: [
{id: “1”,name : “A”,message: “Detail Informasi A”},
{id: “2”, name : “B”,message: “Detail Informasi B”},
{id: “3”, name : “C”,message: “Detail Informasi C”},
{id: “4”, name : “D”,message: “Detail Informasi D”},
{id: “5”, name : “E”,message: “Detail Informasi E”},
{id: “6”, name : “F”,message: “Detail Informasi F”}

],
getLists: function() {
return this.lists;
},
getList: function(listId) {
for(i=0;i<this.lists.length;i++) {
if(this.lists[i].id == listId) {
return this.lists[i];
}
}
}
}


okey, then the css; ini penting yah buat transisi pas itemnya dibuka dan ditutup, biar lebih halus, coba liat sendiri perbedannya yah, hapus aja line yang pertama dan bandingkan hasilnya..

.list .item.item-accordion {transition: 0.09s all linear;}
.list .item.item-accordion.ng-hide {line-height: 0px;}
.list .item.item-accordion.ng-hide-add,
.list .item.item-accordion.ng-hide-remove {display: block !important;}


and then the .js file tinggal taruh didalam controller nya saja:

$scope.shownGroup=null; //default nutup semua

$scope.isGroupShown = function(group) {
return $scope.shownGroup === group;
};
$scope.toggleGroup = function(group) {
if ($scope.isGroupShown(group)) {
$scope.shownGroup = null;
} else {
$scope.shownGroup = group;
}
};


Enjoyyy, atau kalian bisa mampir kesini -> https://codepen.io/ionic/pen/uJkCz

How to get start with Ionic 2

Now, i wanna share about how to start with ionic. Official site ; http://ionicframework.com/

Ionic 2 is still in beta release but, you may want to read about ionic 1 and 2 and should you upgrade to ionic 2 or not ->  here.

First of all you have to make sure this following things already installed to your computer :

  1. Android SDK
  2. Java JDK
  3. NodeJS
  4. AntJS
  5. Cordova Latest Version

And now, we’re ready to start about ionic. http://ionicframework.com/getting-started/

For you who just heard about ionic, you can visit my previos post about ionic right here.

We use Nodejs command line tools to run ionic command , you can read more here https://www.npmjs.com/package/ionic

  1. Install ionic
    $ npm install -g ionic@beta
  2. Create Project
    use –v2 to create ionic 2 project, if you do not add this line, it will install ionic 1 by default. ex : $ ionic start myApp ==> ionic 1 version

    $ ionic start myApp [template] --v2
    $ ionic start myApp tabs --v2 
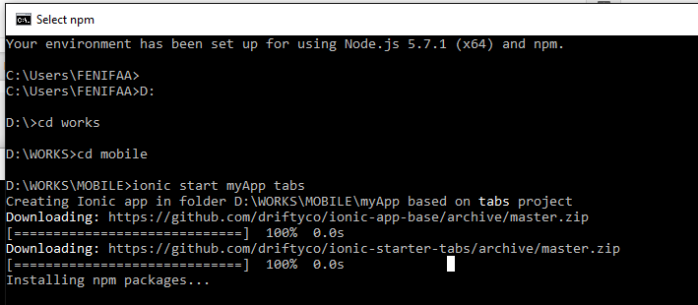
    ionic create porject

    ionic create porject

    I can’t believe i’m having trouble when start ionic project, the installation is stuck on “installing npm packages…” this command try to call the npm packages source but i’ve been waiting for an hour and theres nothing changed. I terminated it, and then try to start a project test again and still the same. My friend, Hadi, wait for it, so long but end up with an error. My senior said, how about restart the PC? Then me and my friend doing that, and still failed. And then, we both try to uninstall the cordova, the ionic again and when start project it is still failed. We spent the day by doing that and still not working. I can’t believe i had something trouble like this, so frustating and finally,  i think this is about the connection -_- Okay, i start again this day. And i try to use my own connection instead of office’s. And i am get through it. Oh my god, i can’t belive, my senior said: ya, because office connection is too slow -_-

  3. Add platform
    $ cd myApp
    $ ionic platform add android
    
    $ ionic build android
    
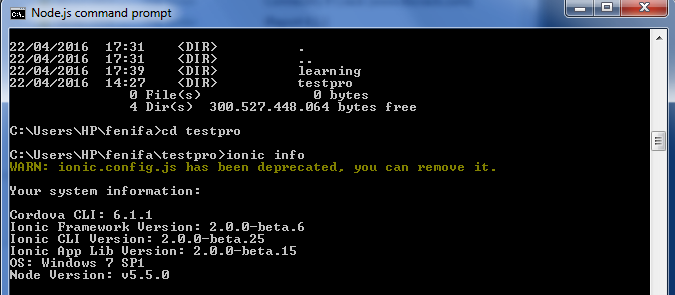
    Oh, and let me show you my ionic info by run this command -> $ ionic info

    ionic info

    ionic info

  4. Emulate project
    $ ionic emulate android
    
    
  5. Run Project
    $ ionic run android
    
    
  6. Run in browsers
    $ ionic serve or $ ionic serve lab
    
    Next, i have to learn the components~ okay, noted! start from today yo! :D
  7. And here some commands that can help you :
    $ ionic g page detail -> will generate your page named 'detail' . A folder 'detail' and by contain detai.html, detail.js and detail.scss like this one :
    
    g page
    
    $ ionic g provider mydata -> will add new file named "mydata.js" under provider folder
    

    provider